Project Purpose & Requirements
The Objective
Control of the flow of the heating agent in each underfloor heating circuit
Home Assistant Integration
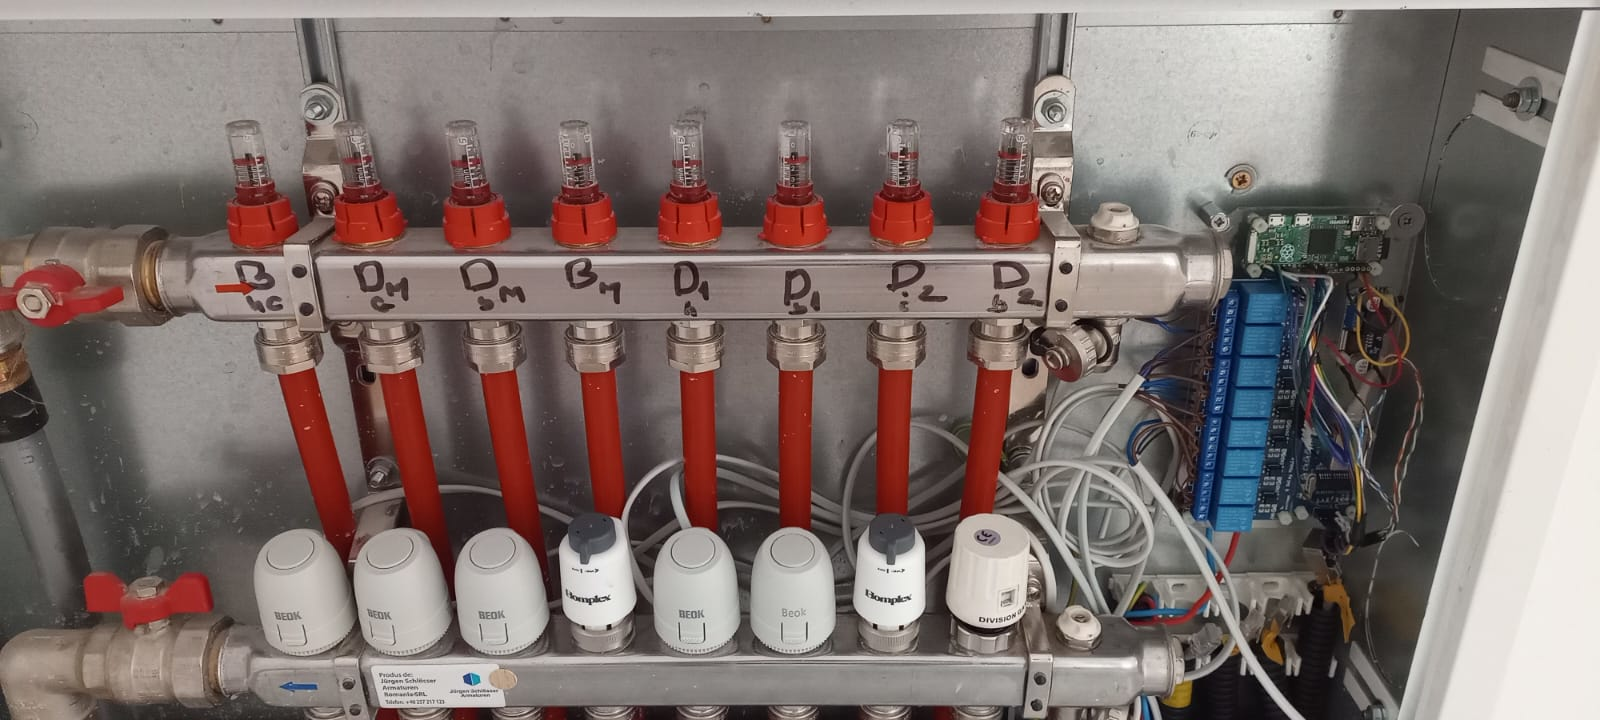
The completed module
Step 1: Electrical Component Manufacturing
The heart of the module consists of two main electronic layers. Detailed assembly instructions and pinout diagrams for these components are located in their respective project files.
1.1 Power & Network
Focuses on the Raspberry Pi Zero 2 W, the ENC28J60 Ethernet module, and the 12V/24V-to-5V Passive PoE step-down logic.
View Power Assembly ProjectStep 2: Fix all together
- 1. Make sure the power wires in the distributor are disconnected from the power supply.
- 2. Mount each actuator[3] in its place on the distributor, identify each circuit which part of the house it heats, label it. It is possible to use different types of actuators respecting the following specs: Force / direction: 80N ≤ F < 130N / up, Connector: M30x1.5 mm, IP45
- 3. Mount the module with screws on the distributor box using spacers, so that it is about 2cm high from the box
- 4. On each actuator connect the blue wires together, finally connect it to the blue wire on the power line
- 5. The red wires on the actuators connect in order it to the (open) pin on each relay
- 6. Connect the red wire from the power line to the common pin of each relay
- 7. Connect the green/white wire from the power line (grounding) to the metal part of the distributor
- 8. Connect the cable connecting the central unit to the module
- 9. Reconnect the power to the distributor
- 10. Install the distributor cap
Step 3: Software Installation & Configuration
Write the provided operating system image[1] to an 8G SD card[2], insert it into the slot on the raspberry pi. All operating system configuration is described in the Operating System Project
List of Materials (BOM)
Referenced components used in this manufacturing process.
| ID | Item | Description/Source |
|---|---|---|
| [1] | Operating system image | Download img |
| [2] | Memory Card 8B | Available on Temu. |
| [3] | Actuator DG92 | Available on TermiX. |